TTK in-situ with Catalyst
These notes describe the installation procedure of TTK for an in-situ usage with Catalyst. In particular, this specific version of the notes describe the procedure for a Ubuntu Linux 17.04 operating system.Note that for an in-situ usage with Catalyst, TTK must be installed twice (same version, 0.9.2):
· In an interactive client mode, on a system dedicated to the interactive design of the data analysis and visualization pipeline, typically a workstation. For this purpose, see the main installation of TTK and add
PARAVIEW_USE_MPI=ON at the step 5.a. · In a batch server mode, on a system dedicated to the actual execution of the simulation code, typically a high-performance system. The remainder of these notes describe the installation for this batch server mode.
For illustration purposes, the in-situ features of TTK will be showcased from within an existing computational fluid dynamic simulation code, Code_Saturne, which already implements Catalyst interfacing features. See the Catalyst documentation to interface your own simulation code with Catalyst.
1. Downloads
The in-situ usage of TTK requires the installation of several third-party packages, from source: Mesa version 17.2.0, ParaView version 5.4.0 and obviously TTK version 0.9.2.
2. Installing the dependencies
Several dependencies will need to be installed in order to compile the packages from source. Please enter the following command (omit the$ character) in a terminal to install them (please see the
documentation of your package manager if your operating system is not Ubuntu Linux):$ sudo apt-get install cmake-curses-gui libvtk6-dev qt4-dev-tools llvm
3. Preparing the sources
Move the tarballs to a working directory (for instance called~/ttk/) and decompress them by
entering the following commands in a terminal (this assumes that you downloaded the tarballs to the
~/Downloads/ directory):$ mkdir ~/ttk$ mv ~/Downloads/mesa-17.2.0.tar.gz ~/ttk/$ mv ~/Downloads/ParaView-v5.4.0.tar.gz ~/ttk/$ mv ~/Downloads/ttk-0.9.2.tar.gz ~/ttk/$ cd ~/ttk/$ tar xvzf mesa-17.2.0.tar.gz$ tar xvzf ParaView-v5.4.0.tar.gz$ tar xvzf ttk-0.9.2.tar.gzNow , you can delete the tarballs after the source trees have been decompressed.
$ rm mesa-17.2.0.tar.gz$ rm ParaView-v5.4.0.tar.gz$ rm ttk-0.9.2.tar.gz
4. Patching ParaView source tree
In order to enjoy the complete set of TTK features, we recommend at this stage to patch the ParaView source tree. This step is optional. To proceed, go to the patch directory and apply it as follows:$ cd ~/ttk/ttk-0.9.2/paraview/patch/$ ./patch-paraview-5.4.0.sh ~/ttk/ParaView-v5.4.0/
5. Configuring, building and installing
a) MesaTo configure Mesa’s source tree, enter the following command (for more details about the compilation flags, see this blog entry) :
$ cd ~/ttk/mesa-17.2.0/$ mkdir build$ cd build/$ ../configure \$ --disable-xvmc \$ --disable-glx \$ --disable-gbm \$ --disable-dri \$ --with-dri-drivers= \$ --disable-egl \$ --with-egl-platforms= \$ --with-gallium-drivers=swrast \$ --enable-texture-float \$ --enable-gallium-osmesaNow you can start the compilation process by entering the following command, where N is the number of available cores on your system:
$ make -jNOnce the build is finished, enter the following command to install your build of ParaView on your system:
$ sudo make installb) ParaView
To enter the configuration menu of ParaView's build, enter the following commands:
$ cd ~/ttk/ParaView-v5.4.0/$ mkdir build$ cd build/$ ccmake ../The configuration interface opens. Press
[c] to configure and [t] to access the
advanced mode, use / to search a cmake option. Once the configuration is finished, please set
the following options as follows (required for TTK's installation):CMAKE_BUILD_TYPE=ReleasePARAVIEW_ENABLE_PYTHON=ONPARAVIEW_INSTALL_DEVELOPMENT_FILES=ONPARAVIEW_QT_VERSION=4VTK_RENDERING_BACKEND=OpenGL2Additionally, to enable the in-situ usage of ParaView, please set the following additional options (for further details, see this documentation):
PARAVIEW_ENABLE_CATALYST=ONPARAVIEW_USE_MPI=ONPARAVIEW_BUILD_QT_GUI=OFFVTK_USE_X=OFFOPENGL_INCLUDE_DIR=OPENGL_xmesa_INCLUDE_DIR=OPENGL_gl_LIBRARY=OPENGL_glu_LIBRARY=OSMESA_INCLUDE_DIR=/usr/local/includeOSMESA_LIBRARY=/usr/local/lib/libOSMesa.soVTK_OPENGL_HAS_OSMESA=ONVTK_USE_OFFSCREEN=OFFNext, press
[g] to generate
and close the configuration
interface when the generation is completed.Now you can start the compilation process by entering the following command, where N is the number of available cores on your system (this will take a LONG time):
$ make -jNOnce the build is finished, enter the following command to install your build of ParaView on your system:
$ sudo make installc) TTK
To enter the configuration menu of TTK's build, enter the following commands:
$ cd ~/ttk/ttk-0.9.2/$ mkdir build$ cd build/$ ccmake ../The configuration interface opens. Press
[c] to configure. At this stage, under Linux,
TTK's build should be automatically configured correctly by default so you can press [g] to
generate.Once the generation is completed, start the compilation process by entering the following command, where N is the number of available cores on your system (this will take a LONG time):
$ make -jNOnce the build is finished, enter the following command to install your build of TTK on your system:
$ sudo make install
6. A computational fluid dynamics use-case: Code_Saturne
In the remainder of this tutorial, we will switch to a concrete use-case of in-situ usage of TTK with Catalyst. For this, we will focus on a computational fluid dynamics simulation code, Code_Saturne, which already implements interfacing features with Catalyst.In particular, we will go through the following main steps:
· install all the required software packages [client and server]
· generate a first representative data set with Code_Saturne [client]
· create an analysis and visualization pipeline for the representative data set with TTK [client]
· export the analysis and visualization pipeline with Catalyst [client]
· integrate the Catalyst/TTK script into Code_Saturne [client, then server]
a) Downloads (both systems, client and server)
The Code_Saturne source tree (version 5.0.4) can be downloaded here.
The Code_Saturne tutorial example that we will use in the remainder can be downloaded there.
b) Installing the dependencies (both systems, client and server)
Several dependencies will need to be installed in order to compile the packages from source. Please enter the following command (omit the
$ character) in a terminal to install them (please see the
documentation of your package manager if your operating system is not Ubuntu Linux):$ sudo apt-get install pyqt4-dev-tools
c) Preparing the sources (both systems, client and server)Move the tarballs to a working directory (for instance called
~/ttk/) and decompress them
by entering the following commands in a terminal (this assumes that you downloaded the tarballs to the
~/Downloads/ directory):$ mv ~/Downloads/code_saturne-5.0.4.tar.gz ~/ttk/$ cd ~/ttk/$ tar xvzf code_saturne-5.0.4.tar.gz$ rm code_saturne-5.0.4.tar.gzd) Configuring, building and installing Code_Saturne (both systems, client and server)
To configure Code_Saturne’s source tree, enter the following commands:
$ cd ~/ttk/code_saturne-5.0.4/$ mkdir build$ cd build/$ ../configure \$ --with-catalyst=/usr/local/ \$ --disable-catalyst-as-pluginNow you can start the compilation process by entering the following command, where N is the number of available cores on your system (this will take a LONG time):
$ make -jNOnce the build is finished, enter the following command to install your build of Code_Saturne on your system:
$ sudo make installe) Post-installation configuration (both systems, client and server)
Once Code_Saturne is installed, append the following lines in the file
~/.bashrc:export LD_LIBRARY_PATH=/usr/local/lib:$LD_LIBRARY_PATHexport LD_LIBRARY_PATH=/usr/local/lib/paraview-5.4:$LD_LIBRARY_PATHAnd to apply these modifications on the current shell, enter:
$ source ~/.bashrcf) Creating the representative Code_Saturne data set (client system)
Now, following the Code_Saturne tutorial example, we will prepare the computation directories. Create the study
simple_junction and the calculation directory case1 by entering
the commands:$ cd ~/ttk/$ code_saturne create -s simple_junction -c case1More details on how to change the parameters of the study can be found in the tutorial. In the following, we will use the pre-configured study located in Code_Saturne source files
~/ttk/code_saturne-5.0.4/examples/simple_junction/ and launch the simulation.$ cd ~/ttk/simple_junction/case1/DATA/$ cp ~/ttk/code_saturne-5.0.4/examples/1-simple_junction/case1/case1.xml .$ cd ~/ttk/simple_junction/MESH/$ cp ~/ttk/code_saturne-5.0.4/examples/1-simple_junction/mesh/downcomer.des .$ cd ~/ttk/simple_junction/case1/$ code_saturne run --param case1.xmlOnce this step is finished, a representative Code_Saturne data set is generated. We will use this data set next to design our analysis and visualization pipeline with TTK.
To visualize the representative data set, open in ParaView the file
RESULTS_ENSIGHT.case in the
directory ~/ttk/simple_junction/case1/RESU/<date-time>/postprocessing/g) Generating the Catalyst script (client system)
We will describe here the general procedure to generate automatically a ParaView Catalyst pipeline, applied to a simple junction testcase but more details can be found in the ParaView Catalyst User’s Guide.
The first step is to start the interactive ParaView on the client system (typically a workstation) and load the
CatalystScriptGenerator plugin in the Manage Plugins wizard under the
Tools menu. Next, in order to create an analysis and visualization pipeline, we provide a
ParaView state file that reproduces the first default built-in example of TTK (critical points, warped
view, persistence curve and persistence diagram), download it
here. In ParaView, click on the
Load State… wizard under the File menu. Then modify the Case File
Name to match the location of the file RESULTS_ENSIGHT.case and click on the
OK button.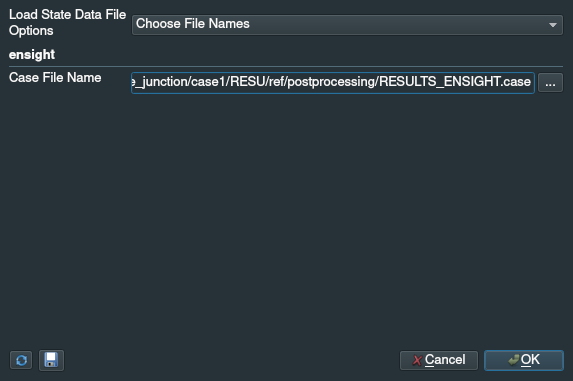
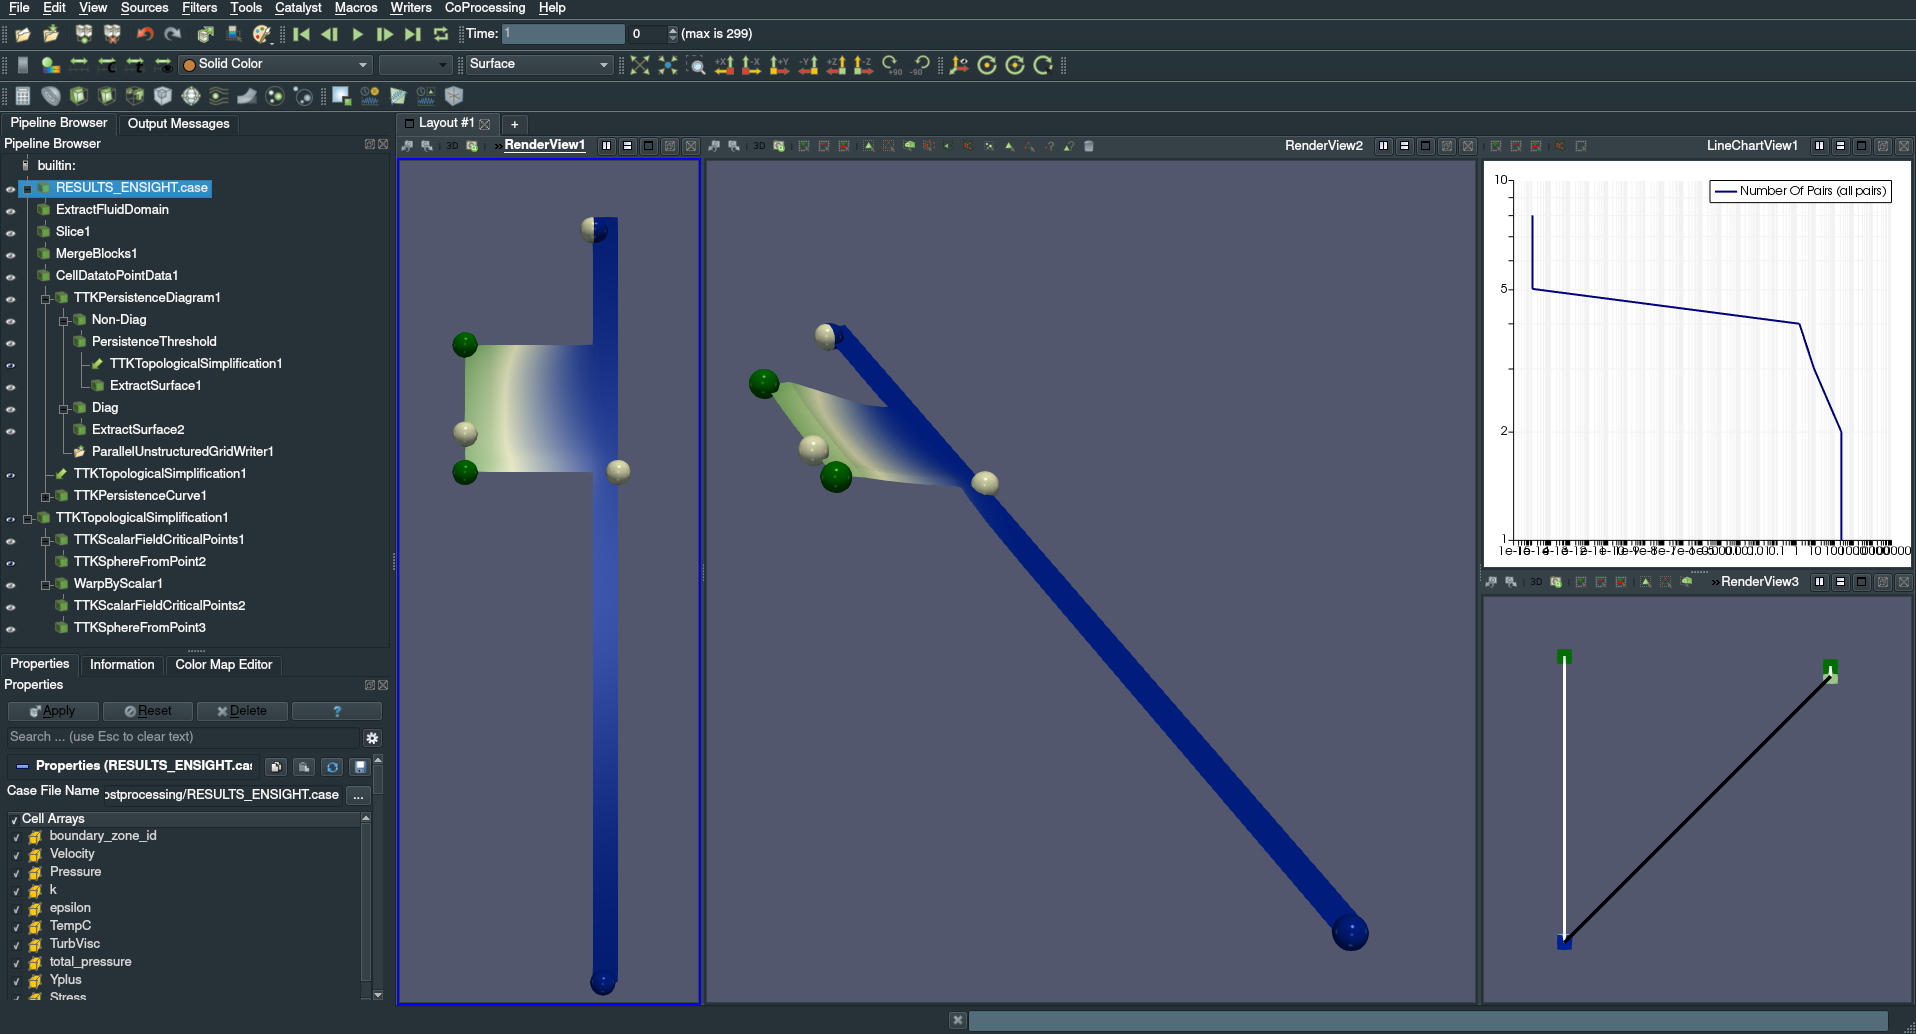
ParaView will apply the visualization pipeline on the dataset and you should obtain something similar to the screenshot below:
Once the full pipeline has been created, a Python script must be exported from ParaView. This is done by choosing the
Export State wizard under the CoProcessing menu. After that, you
must select the sources (i.e. pipeline objects without any input connections, in this example:
RESULTS_ENSIGHT.case) and click on Next. The next page in the wizard offers
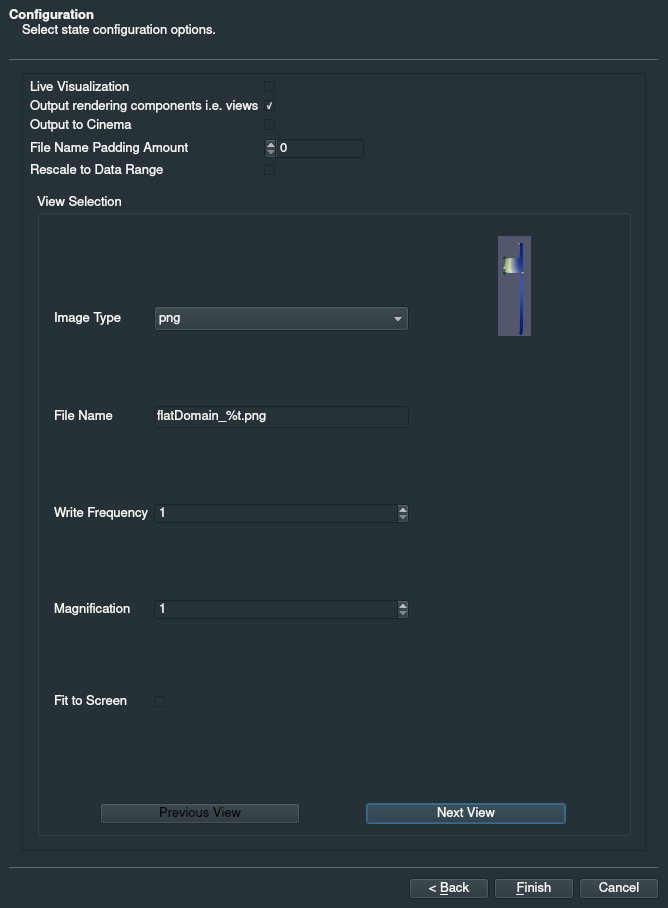
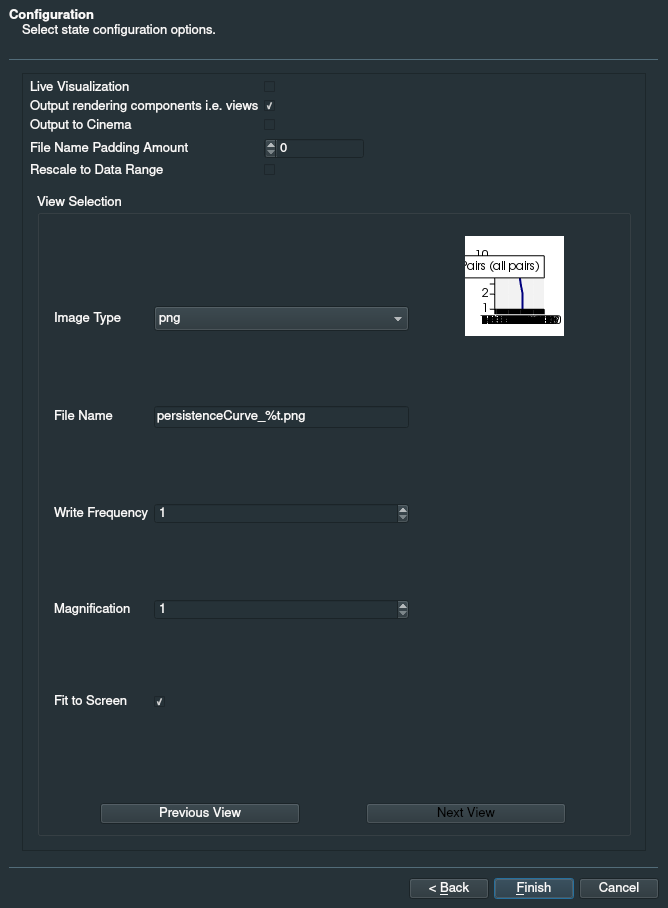
several rendering options, select Output rendering components i.e. views, you will be able to modify a
few other options such as the type and the name of the output images or the write frequency, ...etc.You can iterate through the rendering views with the buttons
Previous View and
Next View.Image Type: pngWrite Frequency: 1Magnification: 1For the rendering views, use the following parameters (screenshot below):

For the rendering views of the persistence diagram and curve, check also the parameter
Fit the Screen as shown by the images below: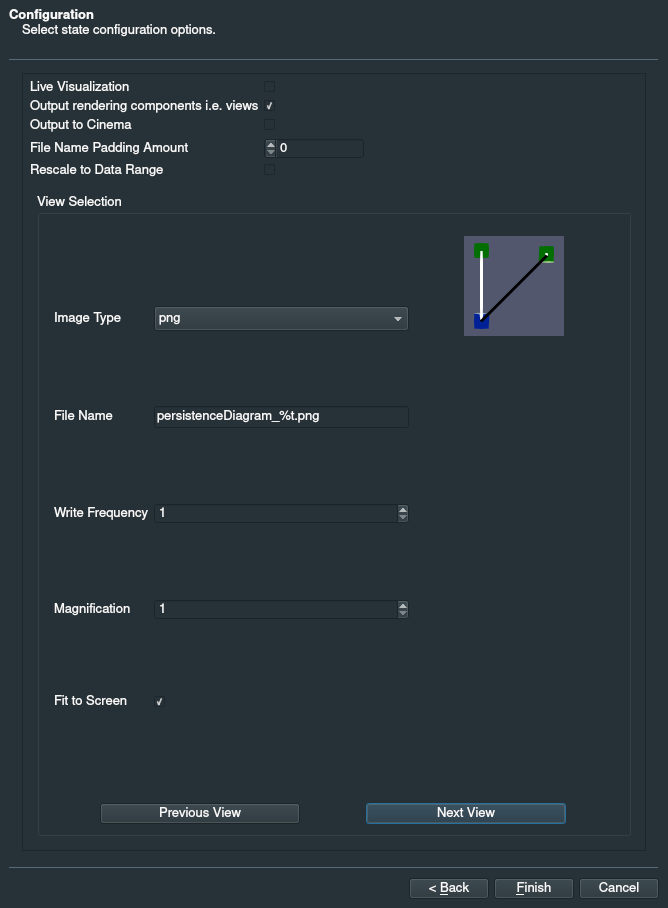
The persistence diagram itself is configured to be written every 10 time-steps in the
Properties
panel of the ParallelUnstructuredGridWriter1 filter in the pipeline (screenshot below).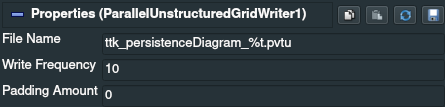
Finally, click on the
Finish button to create the Python script and name it
ttk_pipeline.py.h) Patching the Catalyst script (client system)
To automatically load the TTK plugins, add these lines of code just below the two Python
import lines in the pre-configured script ttk_pipeline.py like in the image below:import globimport osfrom os.path import join as ttk_path_jointtk_plugins_path = "/usr/local/lib/paraview-5.4/plugins/"for x in glob.glob(ttk_path_join(ttk_plugins_path,'*.so' if os.name=='posix' else '*.dll')):LoadPlugin(x, ns=globals())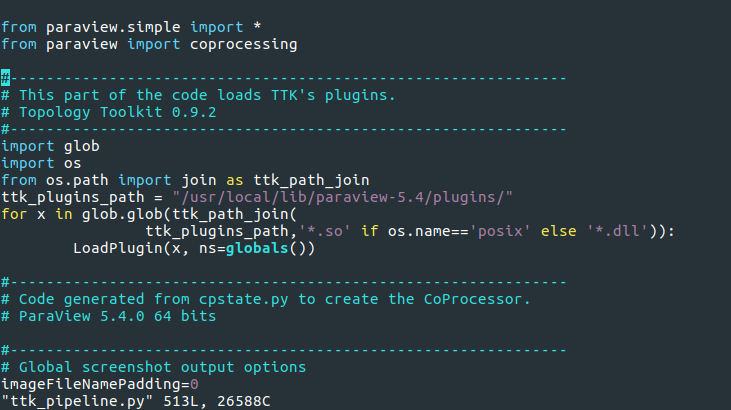
Note that
/usr/local/lib/paraview-5.4/plugins/ is the default location where TTK plugins are
installed. Please change this path according to the values set at step 5.c
(cmake configuration of TTK).i) Integrating the Catalyst script in the Code_Saturne project (client system)
To configure the project to use Catalyst and execute the script in-situ, enter the commands:
$ cd ~/ttk/simple_junction/case1/DATA/$ ./SaturneGUI case1.xml &The study configuration tool of Code_Saturne opens. In the left panel, click on
Calculation control then in the drop-down menu click on Output control, this
will update the central part of the window and show the options related to the generation of the results.
Select the Writer tab and click on the + button at the bottom to add a new writer
module. Configure the writer module with the following parameters (as shown by the screenshot image below):Name: ttk_pipelineId: 1Format: CatalystDirectory: postprocessingThen modify the writing frequency to suit your needs, here is an example:
Frequency:· Output every ‘n’ time steps· 1· Output at end of calculation
Now to associate the Catalyst writer with the mesh, click on the
Mesh tab and select the mesh
part named Fluid domain. Then click on the + button in the section Associated writers,
normally ttk_pipeline will appear as the new one. You should obtain something like the screenshot image below: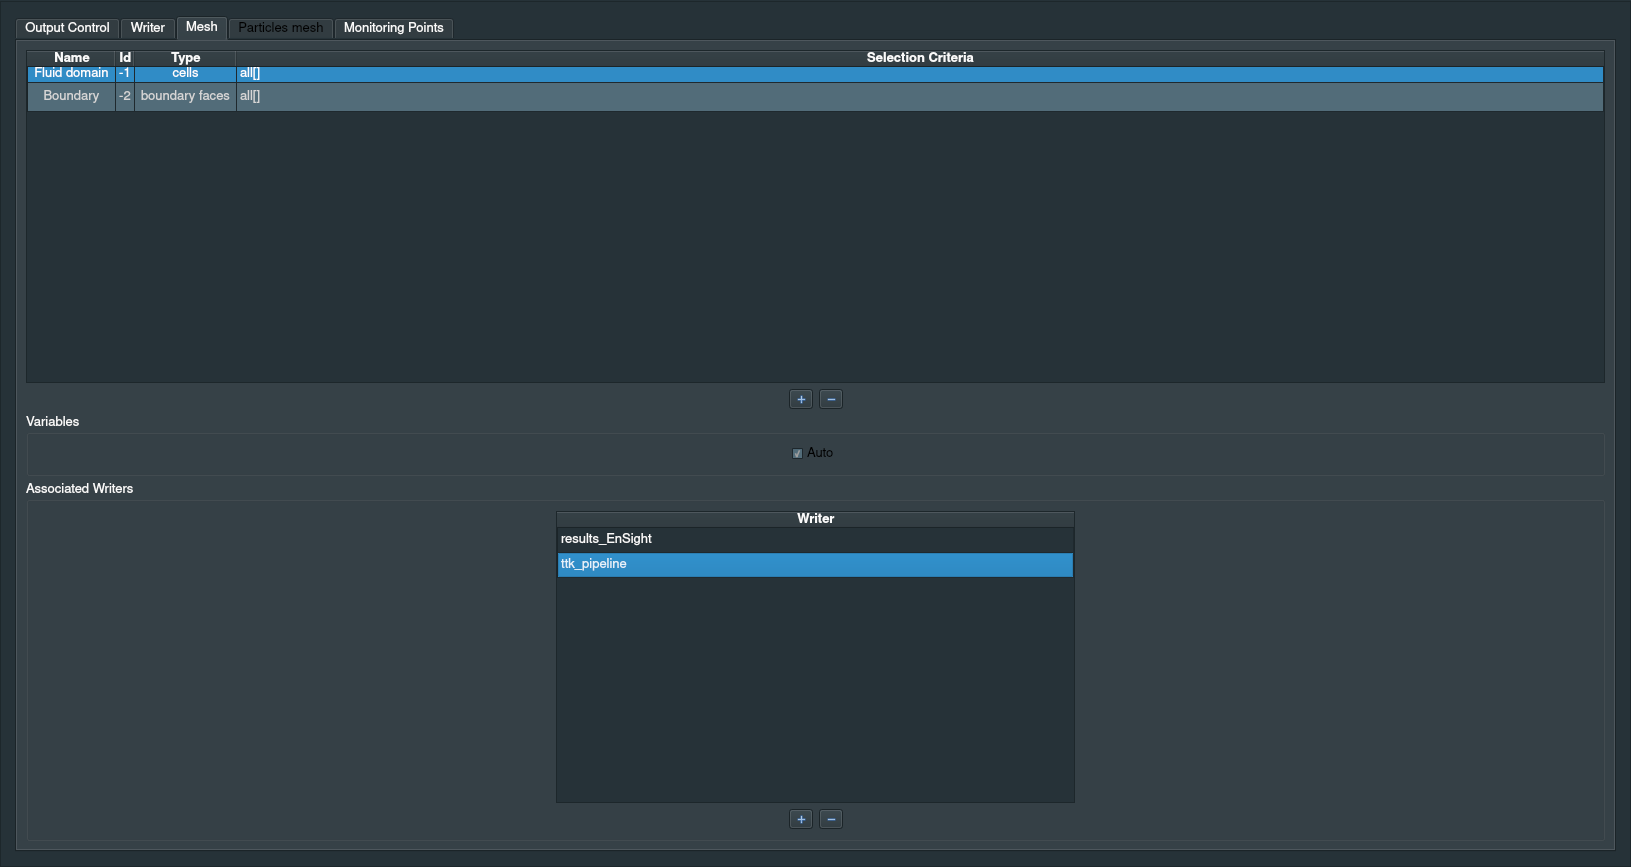
If you want more details about the configuration of a Code_Saturne study with Catalyst, you can follow this video tutorial.
Finally, save the parameters by clicking on the
Save wizard under the File menu.j) Running TTK in-situ (server system)
In the following, we describe how to configure a Code_Saturne / Catalyst project on the server side. Alternatively, jump to this paragraph to directly download a preconfigured mirror package.
First, create a “mirror” project on the server system with the commands:
$ cd ~/ttk/$ code_saturne create -s simple_junction -c case1Now, copy the Catalyst script
ttk_pipeline.py (section 6.f) and the parameters file
case1.xml from the client system (see the directory
~/ttk/simple_junction/case1/DATA/) to the same mirror directory on the server system
(same absolute path). Copy also the mesh downcomer.des located in ~/ttk/simple_junction/MESH/
the same way. Here, please choose the appropriate transfer method between your client and server systems
based on the nature of their connection (for instance, on a TCP/IP network, the command scp may be
recommended).Alternatively, you can also simply download the following tarball, which already contains a mirror of the client’s project. To decompress this tarball, enter the following commands (this assumes that you downloaded the tarballs to the
~/Downloads/ directory):$ mv ~/Downloads/simple_junction.tar.gz ~/ttk/$ cd ~/ttk/$ tar xvzf simple_junction.tar.gz$ rm simple_junction.tar.gzYou are now ready to run your Code_Saturne simulation with an in-situ usage of TTK. For this, enter the following commands:
$ cd ~/ttk/simple_junction/case1/$ code_saturne run --param case1.xmlk) In-situ outputs (on the server system)
The calculation results are stored in
~/ttk/simple_junction/case1/RESU/<date-time>/Once the simulation has finished, you should have a sequence of image files (*.png), for each view configured in the Catalyst script, as well as persistence diagrams (*.vtu), computed every 10 iterations. To generate videos out of these image sequences, please see the ffmpeg documentation.